ACDSee RAW Interface
ACDSee RAW Interface
The ACDSee RAW interface is comprised of 5 panes:
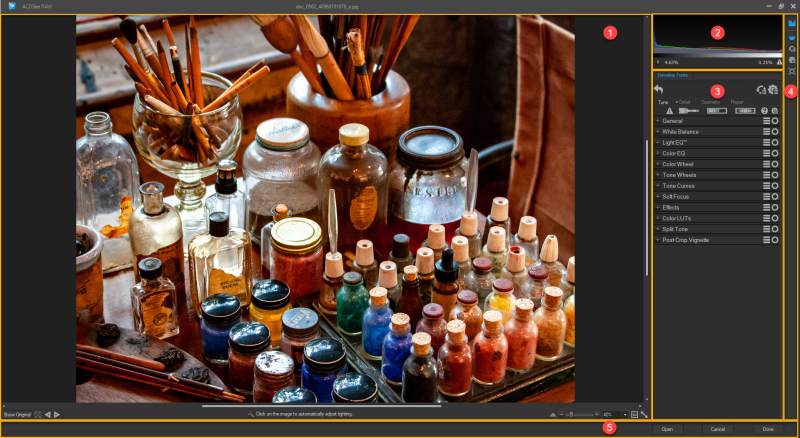
Display Area
Located in the large central portion of the screen, the Display Area is used to display the current state of the opened image.
Display Area Options
| Show Original | Click and hold to view the original image. Release the button to return to the edited image. | |
| Full Screen |
|
Click to display a full screen preview of the final image. |
| Previous Image |
|
Click to return to the previous image. |
| Next Image |
|
Click to advance to the next image. |
| Show Filmstrip |

|
Click to show the filmstrip. |
| Hide Filmstrip |

|
Click to hide the filmstrip. |
| Zoom Slide |
|
Move the slide to the right to zoom into the image. Move the slide to the left to zoom out of the image. |
| Zoom Percentage |

|
Enter a numerical value or select a number from the drop down list to set the zoom level. |
| Actual Size |
|
Click to return the image to its actual size. |
| Fit Image |
|
Click to fit the image to the Display Area. |
Histogram
The Histogram is a graph that represents the distribution of color intensity for each color channel in an image. The Histogram, when enabled, resides at the top of the right-side column of tools.
To enable the Histogram, click the ![]() icon in the Tool Bar or press H. To disable the Histogram and remove it from view, click the
icon in the Tool Bar or press H. To disable the Histogram and remove it from view, click the ![]() icon in the Tool Bar.
icon in the Tool Bar.
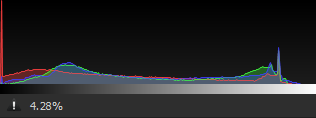
A proportion of clipped pixels is reported as a percentage value directly below the Histogram graph.
Develop Pane
The Develop pane is home to the main body of functionality for ACDSee RAW. Residing to the right of the Display Area, and directly below the Histogram, if enabled, the tools available in the Develop pane are driven from selections made in the Tool Bar.
The Develop pane has 4 sets of tools:
- Develop Tools,
- History,
- Develop Presets, and
- Snapshots.
Develop Tools
The Develop Tools pane is enabled by clicking the crown ![]() icon in the Tool Bar or pressing Ctrl + Shift + T.
icon in the Tool Bar or pressing Ctrl + Shift + T.
The Develop Tools pane consists of 4 tabs,
Develop Tools Options
| Undo |
|
Removes the last action. |
| Redo |
|
Reinstates the last action removed by an Undo. |
| Reset to Defaults |
|
|
| Expand All Groups | Expand all groups under the selected tab. | |
| Collapse All Groups | Collapse all groups under the selected tab. | |
| Auto-Collapse Groups | If enabled, all groups in all tabs will open in a collapsed state. | |
| Adjust develop settings |
|
|
| Reset to Last Saved | Reset the fields in the selected group to match the last saved settings. | |
| Reset to Defaults | Reset the fields in the selected group to their defaults. | |
| Apply Last Used | Apply the last used field settings to the current image | |
| Presets | Select to view an extensive list of preset image configurations. | |
| Save Preset... | Select to open the Save Develop Settings Preset dialog and select the settings to save in a preset. | |
| Manage Presets... | Select to open the Manage Presets dialog where existing presets can be deleted or named. | |
| Copy Settings... | Select to open the Copy settings dialog where develop settings can be selected and copied to the clipboard. | |
| Paste Settings | Pastes the develop settings selected in the Copy settings dialog into their respective groups. |
History
The History pane is enabled by clicking the ![]() icon in the Tool Bar or pressing F9.
icon in the Tool Bar or pressing F9.
The History pane is used to view the sequence of changes made to an image, jump around in the editing sequence, or revert back to a previously-applied adjustment. For example, if a series of adjustments were applied to an image, such as color adjustments, followed by sharpening, and exposure tweaking, but you want to revert back several steps to the state the photo was in with just the color adjustment, use the History pane to travel back to that point in the edit sequence.
To return to a specific adjustment, select and double-click the desired adjustment in the History pane, or click the Undo All button at the bottom of the pane to undo all adjustments.
Develop Presets
The Develop Presets pane is enabled by clicking the ![]() icon in the Tool Bar or pressing Ctrl + Shift + P.
icon in the Tool Bar or pressing Ctrl + Shift + P.
To make the Develop process easier, use the Develop Preset pane to create, delete, manage, and categorize global presets. (See Develop Presets for more information).
Snapshots
The Snapshots pane is enabled by clicking the ![]() icon in the Tool Bar or pressing P.
icon in the Tool Bar or pressing P.
Snapshots allow adjustments to be made at any point during the development workflow. As new adjustments are made, take a snapshot to save the work up to that point. Continue to edit as desired but return to a previous version of the edits by selecting the snapshot. Unlike presets, snapshots save directly to the image and automatically re-enter the Develop workflow where snapshots can be interchanged and further edits applied.
To take a Snapshot:
- Make adjustments to an image.
- Click the Snapshots icon.

- At the bottom of the Snapshots pane, click the
 icon.
icon. - In the New Snapshot dialog, enter a name for the snapshot and click OK. The saved snapshot will be listed in the Snapshot pane.
Snapshot Options
| Update to Current Settings | Applies the currently saved image settings into the snapshot, erasing all previously held settings in the snapshot. |
| Apply Selected | Applies the snapshot's settings into the image. |
| Delete Selected | Deletes the snapshot from the Snapshots pane. |
| Rename Selected | Renames the selected snapshot. |
Tool Bar
The Tool Bar resides at the extreme right of the ACDSee RAW interface.
The Tool Bar contains 5 icons for populating the Develop pane:
- Historgram,
- Tools,
- History,
- Presets, and
- Snapshots
Button Bar
The Button Bar resides at the bottom of the ACDSee RAW interface.
The Button Bar contains 3 buttons for file management in the Develop pane:
- Open: Saves changes made to the image and opens the image in the Editor.
- Cancel: Cancels any changes made to the image and closes ACDSee RAW.
- Done: Saves any changes and exits ACDSee RAW.